With Halloween just around the corner, I wanted to make a little treat to send to school with my kids for their teachers. I found these candy corn pails in the dollar bins at Target and added a vinyl adhesive letter to the fronts. Using my Cricut and adhesive vinyl I cut out each teacher's initials. I stamped pumpkins on scrap cardstock and tied tags to the pails using baker's twine. For very little cost, I created a gift that is sure to make them smile! Sometimes it's the little things that make the biggest difference.
Saturday, October 17, 2015
Saturday, March 15, 2014
Kiwi Lane Basic Sketches #3
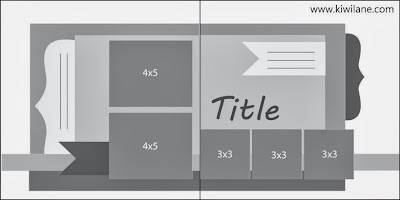
Kiwi Lane Designs, one of my favorite go-to scrapbook companies, is featuring a new layout for their Basic Sketches contest and I decided to give it a go. I killed two birds with one stone by getting caught up on some photos from our 2013 Disney trip. I am SO behind, but look at it as one more completed project rather than thinking of all the pictures I have yet to scrapbook. This is a little different than their DT Doodles Contest in the fact that you don’t have to use their Designer Templates to participate for a chance to win a $25.00 Kiwi Lane gift certificate to the KLD SHOP. You are encouraged to use the sketch as a springboard for your inspiration. Below is their sketch #3.
Here is my completed interpretation of the sketch:
I added a journaling pocket behind the bracket to hide my journaling by cutting out a smaller bracket and adding an eyelet and ribbon. I wanted the photos to be my focus, not my less than perfect handwriting.
For more sketch ideas like these visit Kiwi Lane's website.
Friday, January 10, 2014
Kiwi Lane's 2014 DT Doodles Contest #1
Each month Kiwi Lane presents a sketch using their fabulously versatile Designer Templates and challenges scrapbookers to come up with their own interpretation of the layout. Here is their very first sketch for 2014, and dare I say I am THE FIRST ENTRANT FOR 2014!! Woot-woot!!!
So many pictures from Disney...Just had to do these of Whispering Canyon Café at Disney's Wilderness Lodge in Orlando. Such a fun dining experience and lots of cool photo ops around the resort too!
If you would like to try your hand at sketches like these head over to Kiwi Lane to learn how.
Sunday, December 22, 2013
Tis' the Season
So I'll admit that Christmas pages are the pages that I scrapbook the least. Not really sure why. Maybe it's because the holidays are often so rushed by running here, there, and everywhere - leaving little time for crafting. I find myself making many teacher gifts and gifts for others, but seldom sit down to document the loads of family photos taken at the holidays. I made a promise to myself to do better this year.
Using the Mini Scallops, Rings, and Mini Aspen designer Kiwi Lane templates I came up with this simple layout to feature one of my favorite pics of the kids from LAST year. Better late than never, right?
I started by tracing the rings templates lightly with pencil and adding mini glue dots along the pencil lines. I added individual black sequins on the glue dots to imitate the sequin pattern on my daughter's dress. This process was tedious, but I achieved the look I wanted.
After cutting a mini scalloped border, I ran half of the scallop through my Texture Boutique embosser inside an embossing folder, repeating the same on the other half of the border. Make sure that you line the paper up with the stripes that have already been embossed. I used my rub-on tool to smooth out any stripes where the folder left an edge.
White Stickles were added to give an effect of snow along the edge of the Mini Scallop border.
On the Tiny Tags template, I stamped the word blessed and added a blingy brad from Carta Bella to fill in an otherwise empty space on the page. Pretty pleased with the result even if it is only a one-pager.
Kiwi Lane Designer Templates Used: Tiny Tags, Mini Scallops, Mini Aspen Ct., Rings, Strips
Patterned paper: Heidi Swapp
Friday, December 6, 2013
Kiwi Lane December Blog Hop
Welcome to the December Kiwi Lane Designs Blog Hop! If you landed here first, you should head back to the Kiwi Lane Blog so you can make your way through the whole hop! I am thrilled to be selected this month as a guest designer in my first ever blog hop, although I have been a huge fan of Kiwi Lane Designs ever since I stumbled upon their booth at CKC Louisville a few years ago. I hope to share some scrapbooking inspiration with you using their fabulous designer templates!
Here is my finished project. Stay tuned to find out how you can have a chance to win this mini album for yourself!
For my project, I received the adorable and versatile Mini Scallops set. These Mini Scallops are the perfect complement to the larger Scallop Borders or can be used year-round for any page, card, or project. I find myself reaching for them over and over. These are a smaller scale than the Scallop borders and great to use vertically, horizontally, or on a diagonal for your pages.
I began by taking 3 standard-size gift bags, folded them in half, and hole punched all three. I used 2 loose binder rings to hold the bags together. Note: You will want to arrange the 3 bags so that handles actually hold the album closed like a purse. When they are not arranged correctly, one of the "pages" will hang down.
The bottoms of the gift bags made a flap after each couple of pages. You could use this for more photos, but I decided to glue the flaps closed using Sticky Lines to help my album lay flat.
Using a piece of Black Magic Core-dinations Cardstock, I cut out an ornament using the Tiny Holiday 6T Accessory, ran it through my Texture Boutique embossing machine using the Cuttlebug swirls embossing folder, and sanded the ornament to reveal the green color underneath.
Because I used gift bags, each bag created a pocket page where I could slide photo mats and tags for journaling. The Simple Stories 4x6 Snap Cards made this super easy. They fit perfectly into each bag with just a slight bit hanging over, and are double-sided (so they look good from the front and the back of each page). I used my Mini Scallops templates to give each one more visual appeal along the top.
I did the same along the edges of these pages, but traced two Tiny Bracket templates side by side to create a different edge on some of the pages.
I inked all of the edges with my sponge dauber and added buttons and brads.
And finally, the back cover...
Gift handles allow you to tote your album easily. This got my wheels turning...I could do this with ANY gift bag for ANY theme mini album: wedding, birthday, etc.
Kiwi Lane Designer Templates used:
*Mini Scallops 1A, 2A, 3A*Strips
*Tiny Tags 5T, 6T, 7T
*Tiny Holiday 6T
*Tiny Brackets 1T, 3T, 4T
Paper used:
*Simple Stories Handmade Holiday
Collection
*Simple Stories Handmade Holiday
4x6 Sn@p Cards
*Core-dinations Cardstock
Materials/Tools used:
*Cuttlebug swirls embossing folder
*Texture Boutique embossing machine
*Texture Boutique embossing machine
*3 standard-size gift bags
*2 binder rings
*dark brown ink
*Ribbon: American Crafts (reds and brown lace)
& Stampin Up (green)
*Buttons: Stampin Up
*Red Pearls: Queen & Co.
*Brads: Making Memories & Carta Bella
- Kiwi Lane http://kiwilane.com/here/blog/
- Mary Hartmann Bowden http://mequilter.blogspot.com/
- Janie McKissick http://www.typicalscrapbboker.com/
- Carrie Bryant http://carrieshappyscrappin.blogspot.com/
- Amy Berrett http://ladybugsspotblog.blogspot.com/
- Cassandra Henson http://fortheloveofscrap.com
- Carrie McDaniel http://carriedawaywithcrafting.blogspot.com/ <------You are here
- Apryl Holland http://onescrappysoul.blogspot.com/ <------ Go here next
- Erin Colby http://oursliceofcheese.blogspot.com
- Brenda Smith http://theimperfectscrapper.blogspot.com
ANOTHER CHANCE TO WIN...
And how would you like to WIN the adorable GIFT BAG MINI ALBUM featured in this post?!! Just leave me a comment and become one of my followers. The lucky winner will be announced here on Thursday, December 12th. Good luck!
Congratulations to Tina who said...
TINADecember 6, 2013 at 11:41 PM
Oooooo! I would LOVE to win your mini album!
Tina, You are the lucky random winner of the gift bag mini album!!!! Please email me your mailing address at carriescrafting@gmail.com and I will get it shipped out to you ASAP. Thanks for following me!
Friday, November 22, 2013
Subway Signs
So everywhere you look you see subway signs nowadays. Craft stores, eBay, furniture stores...While there are many to choose from, I never could find one in the colors or wording that I wanted. So...I decided to create a custom one myself using a blank canvas, paint, a paisley stencil from Michael's, black vinyl, and my Cricut. Here is the result:
It may not suit everyone else's taste, but it certainly sums up our home well.
It may not suit everyone else's taste, but it certainly sums up our home well.
Friday, October 18, 2013
Organizational Nut
So yes, I admit I am an organizational nut. I spend just as much time organizing my craft and scrapbook supplies as I do actually using them. However, when I saw this Fintorp rail and hook system from IKEA, I knew I had to have one (along with 20 hooks) to organize all of my scrapbook templates from Kiwi Lane. My hubby was a dear and hung it up right behind my crafting table so I could reach them without searching or getting up. What do you think? I just love how it tidies up my space!
Subscribe to:
Comments (Atom)


